
Setting up your Rails 7 cloud-based development environment for your iPad
I’ve always loved the idea of being able to work on software on the go and the newer iPad setup is a perfect device for that. The battery life is really great and offloading the core computing resources to a machine in the cloud is much more accessible now. Using the iPad is also a very enjoyable experience over a MacBook and the portability can’t be beat.
It’s been fairly difficult and not really worth it to run a setup like this but with more online IDEs becoming available including GitHub’s codespaces, coder.com, GitPod, and Cloud9 I wanted to revisit a roll your own approach. I’m also not using VS Code as my primary editor and still enjoy the split and flexibility of VIM + Tmux. I did try out a few of these IDEs but just found them to be a bit slow and you’re also learning all of the configuration and tweaks for that specific system, instead of a system I already know and love. And really, I was frustrated with Codespaces not being generally available yet too, soon though.
My goal for trying out this type of setup was to see how simple I could make it to get Rails 7 hosted on a virtual machine with the majority of my existing toolset all via iPad and updated via iPad.
The VPS
First things first, you’ll need to pick a VPS host. I’m going with Digital Ocean(DO) and I’ll be using the Docker marketplace image to skip a few steps. I prefer DO because of the simplicity of their dashboard, API, and Terraform provider. One of the most important parts of this setup is to pick a VPS that has a region that’s fairly close to you, this is a setup where you’re going to notice the latency if it’s too high.
I’m in Phoenix, AZ and I tried out a few before getting started:
- Server Hub - They have a data center in Phoenix but the latest Ubuntu image they have is 16 LTS and after upgrading to 20 LTS I started to see random library issues so I just abandoned this approach. When I looked at the latency over ping they were coming in around 30ms, DO in SFO was coming in around 30-40ms so it just wasn’t worth it to continue down this path.
- Vultr - Another great VPS option, the initial VPS setup process just wasn’t as smooth as I wanted. I provided a key file but then I wasn’t able to get in with it. They do have a closer data center in LA but the latency was the same as DO so it didn’t matter.
- Digital Ocean(DO) - Ended up going with DO which is where I have a few other resources and I use it quite a bit already. Their marketplace images are great, I’ve been using their Dokku image and it’s really easy to get a Herokuish PAAS setup in a very short amount of time.
The Terminal
There are a few options out there for an iPad terminal but Blink is hands down the best. There’s a few settings that really help especially when needing to use the ESC key and the CTRL key quite a bit. Blink also works really well with Mosh which is the best way to connect to your server when you’re using an iPad. Blink also just looks and feels like a real Terminal which it sort of is but it’s not a full bash/zsh/sh environment.

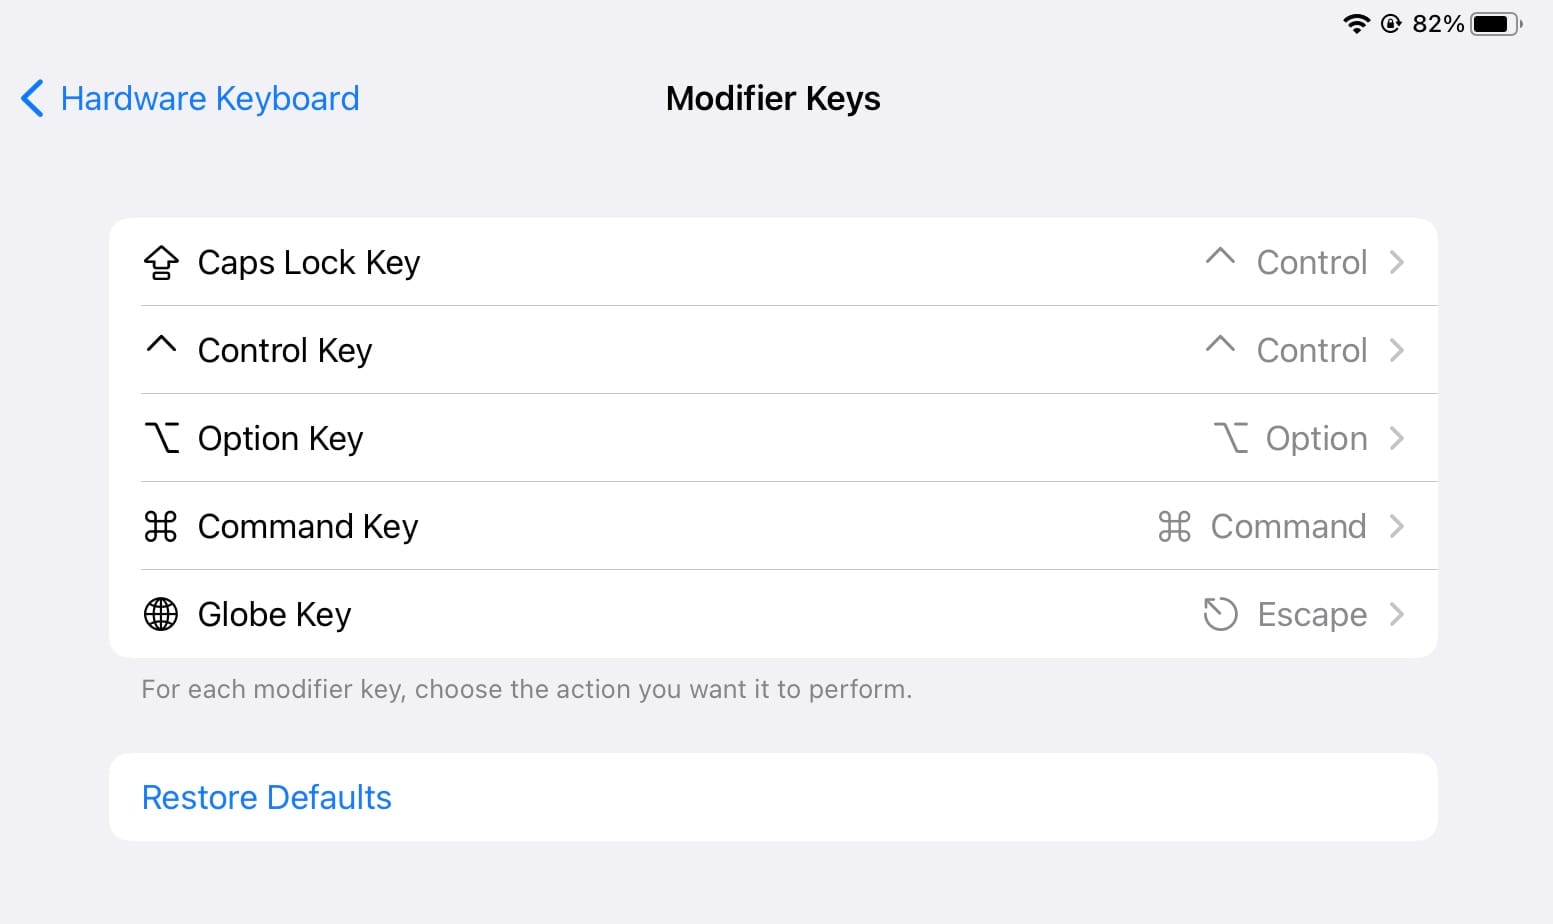
One of Blink’s best features is also finally part of iOS too which is remapping your modifier keys(cmd, ctrl, option, esc, globe). The important remaps being caps lock(to ctrl) and adding the missing esc key via the globe key. I highly recommend remapping your keys, it’s in Settings -> General -> Keyboard -> Hardware Keyboard -> Modifier Keys.
Also, fun fact. The iPad keyboard by default already maps CMD+. to ESC and Blink maps ESC automatically to CTRL+[.
Setting up Blink
Once you’ve downloaded Blink we’re going to use it to generate our SSH key files that we’ll add to Digital Ocean to connect to the box. It looks like Blink will eventually support password protected key files but it currently doesn’t, you could always generate this key file on a regular laptop and then import into here instead.
Open the preferences in Blink by hitting CMD+, and go to the Keys section. Tap the + at the top right of that window. Name and create a new RSA key.
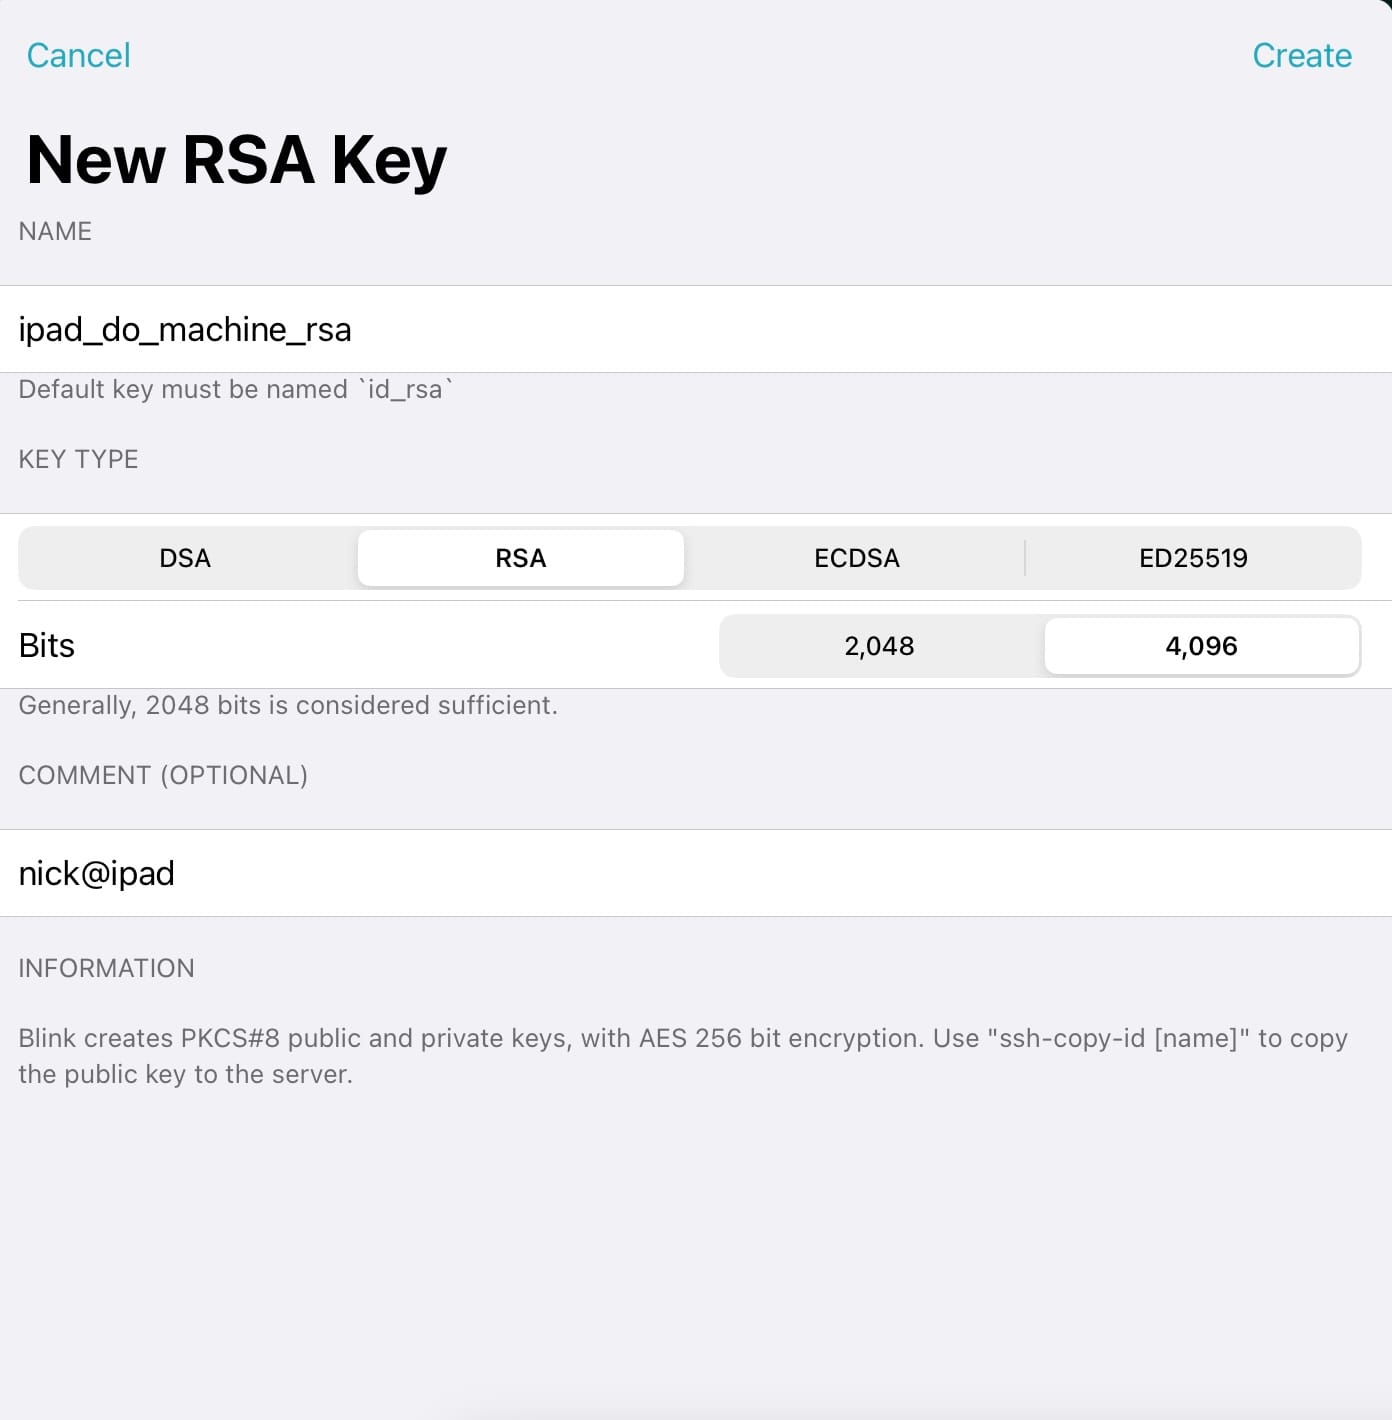
After creating the new key tap into it and then you’ll see a copy button just below your public key, copy that and head over to Digital Ocean. I’ll be using the marketplace image that already has Docker CE and Docker Compose installed. If you’d like to install Docker yourself then just go with whatever base distro you’d prefer.
With the Docker marketplace image as your base image go ahead and pick a size and the region that’s closest to you. Don’t worry about block storage right now, you can always add that later. Check the “monitoring” checkbox which is free and gives you some simple machine stats that are helpful.
For authentication we can go ahead and select SSH keys and then add in the public key for the one we just created in Blink. And since this is basically a pet and not cattle, go ahead and name it something fun for yourself, I’ll wait.
Once your machine is up and running grab the IP address and we can configure the host in Blink. Open up the settings again and go to the Hosts section, click add at the top right.
Add your new host by specifying:
- Alias - I usually just match this with the Hostname, Blink is pretty good about tab completion once you start typing ssh/mosh
- Hostname - The new VPS IP address
- User - Set this to the username that you’d like to use, we’ll create a new one
- Key - Select the key you just created
This host creation is Blink’s equivalent of adding a host to your SSH config so that you can use the alias without having to setup DNS or anything but still make it easy to connect to.
After creating the host we should now be able to SSH into it by running ssh [alias] so in my case ssh root@demo.nickhammond.com.
Once logged in we’ll see the MOTD and be dropped into a command line as you’d expect. We can test that Docker is up and running by running the hello-world example:
docker run hello-world
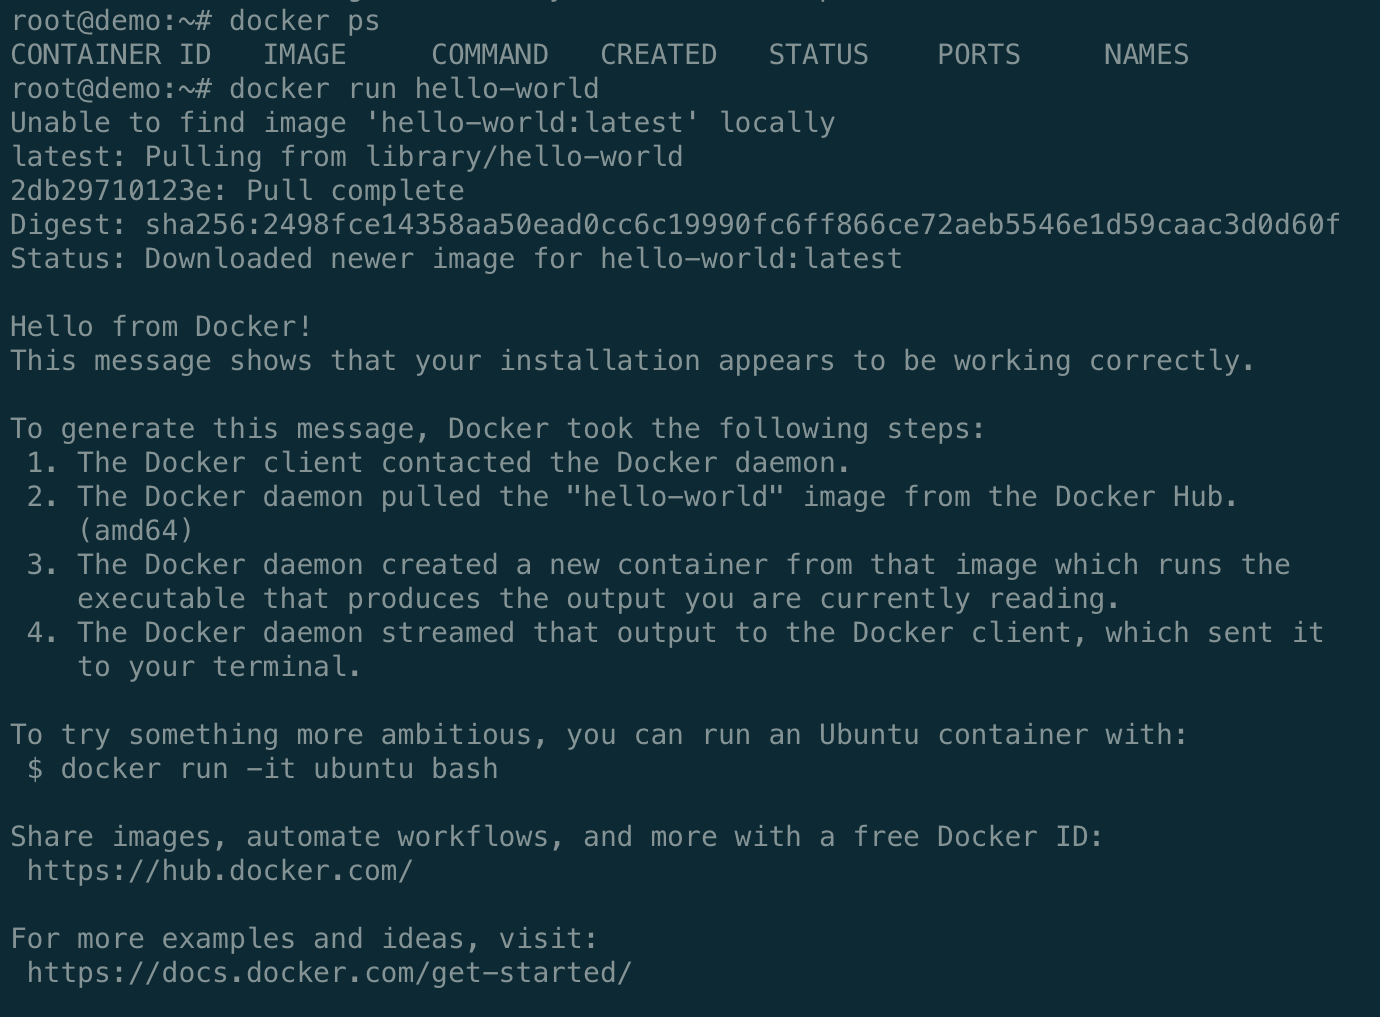
We’ll be utilizing Docker for our backing services so that we can easily configure Postgres and eventually Redis while also being able to run multiple versions if we need to.
The new user
Now that we’ve verified we can connect to our machine and configured Blink we should go ahead and create a new user that’ll be our primary user for everything.
I prefer zsh but if you prefer bash you can go ahead and skip the zsh steps for this and create the new user with the /bin/bash shell.
First I’m going to install zsh and tmux with apt, we’ll use tmux in a bit here:
sudo apt-get install zsh tmux
Now that we have zsh installed we can go ahead and create the new user and specify that as our shell:
useradd --create-home --groups docker -s /usr/bin/zsh nick
Adding the user to the docker group ensures that the new user can interact with Docker CE and Docker Compose.
To connect as the new user we’re going to go ahead and copy over the public key file that we used to create the machine with.
mkdir /home/nick/.ssh
chmod 700 /home/nick/.ssh
cp ~/.ssh/authorized_keys /home/nick/.ssh/
chmod 600 /home/nick/.ssh/authorized_keys
chown -R nick:nick /home/nick/.ssh
I’d also recommend setting up passwordless sudo for the new user via visudo. Run visudo and then add this line:
nick ALL=(ALL) NOPASSWD:ALL
With that configured open up a new tab in Blink CMD+t and ssh as the new user using the alias you configured:
ssh nick@demo.nickhammond.com
Once that connects successfully do a quick sudo test sudo ls. After successfully verifying that you can login as the new user and run sudo without issues we should disable root login via sshd_config. Update the line PermitRootLogin no in /etc/ssh/sshd_config to yes instead of no and then restart ssh.
sudo vim /etc/ssh/sshd_config
sudo service ssh restart
Homebrew
You could probably use apt for this or follow all of the installation instructions for the various things we’re going to install use Homebrew for Linux for simplicity. It makes managing my Ansible playbooks simpler between Ubuntu and macOS and you’ll usually get newer versions than you’d get with Apt but you also don’t need to deal with adding custom apt repos for everything.
First we’ll start a new tmux session so that if we lose our connection everything keeps on installing and we can come back to it from any machine. (If you prefer screen then swap tmux for screen.)
Create a new tmux session named build:
tmux new -s build
Once we’re in here then we can start installing Homebrew, you’ll notice that it’s going to install in /home/linuxbrew as well. The Homebrew on Linux page describes a few details around the setup for Linux and reasoning around this additional home directory.
/bin/bash -c "$(curl -fsSL https://raw.githubusercontent.com/Homebrew/install/HEAD/install.sh)"
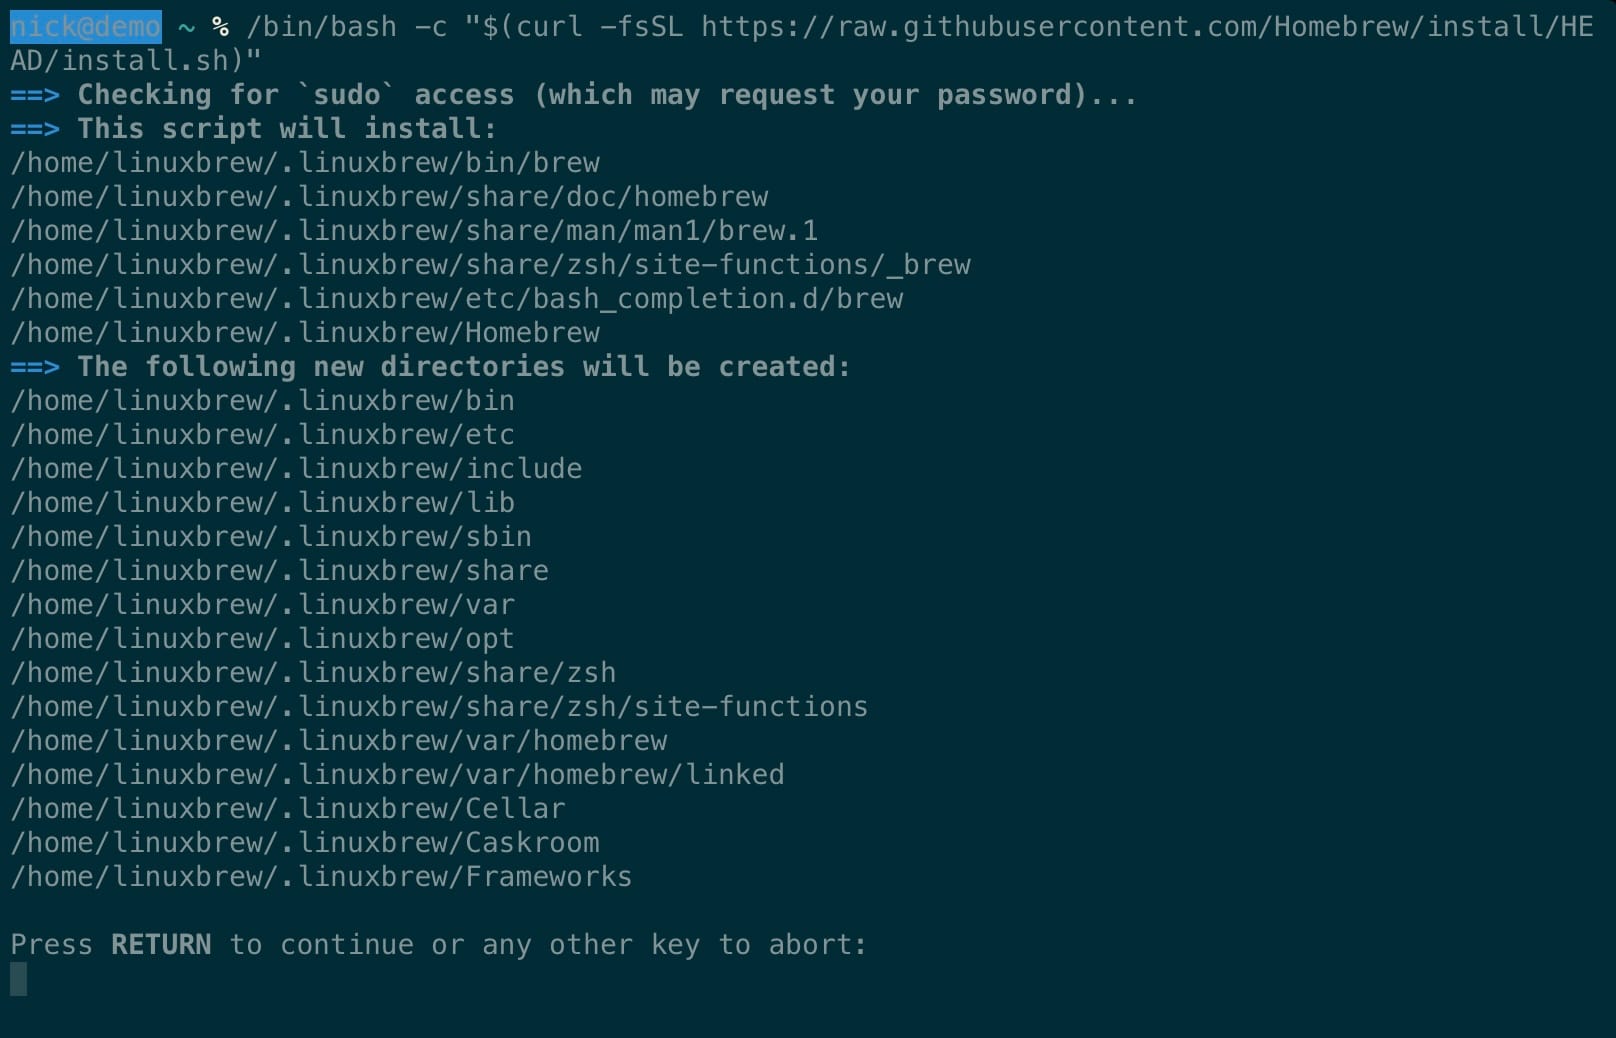
Once that finishes follow the “Next Steps” section which will auto load a few things for Homebrew. You’ll also want to install build-essential and gcc which will help with things later on.
test -d ~/.linuxbrew && eval "$(~/.linuxbrew/bin/brew shellenv)"
test -d /home/linuxbrew/.linuxbrew && eval "$(/home/linuxbrew/.linuxbrew/bin/brew shellenv)"
test -r ~/.bash_profile && echo "eval \"\$($(brew --prefix)/bin/brew shellenv)\"" >>~/.bash_profile
echo "eval \"\$($(brew --prefix)/bin/brew shellenv)\"" >>~/.profile
sudo apt-get install build-essential
brew install gcc
Great, now we can utilize Homebrew to install a few additional things. I’ll be utilizing a base Ansible playbook that I’ve created to get a few things setup like my dotfiles, some additional dependencies, and oh my zsh.
Environment setup
First we can install Ansible with Homebrew:
brew install ansible
After that finishes I’m going to grab my Ansible playbook that’ll do the majority of the rest of the setup. While we’re waiting for that to finish we can go ahead and add our key to GitHub so that we can clone our repositories to our machine.
Since the key file that we created with Blink doesn’t have a passphrase we’ll want to generate a new one that belongs to the machine that does have a passphrase. On the machine go ahead and create a new key and set a passphrase on it. Grab the contents of the public key and head over to GitHub to add the new key.
ssh-keygen
cat ~/.ssh/id_rsa.pub
By the time you’ve added that key Ansible should be done installing so we can start running our playbook. We’re adding the key for our private dotfiles and any additional future private repositories that we’ll need access to.
Test access to GitHub by attempting to ssh to git@github.com and it should greet you back with your username:
ssh git@github.com
Provisioning with Ansible
Create a new file called playbook.yml and add the following contents, modify as you need for your use. You might need to remove dotfiles-private if you don’t have those and update a couple of GitHub endpoints to your own username.
---
- hosts: all

  vars:
    home: "{{ lookup('env', 'HOME') }}"
    web_home: "{{ home }}/src"
    rubies_home: "{{ home }}/.rubies"
  tasks:
    - name: Install apt packages
      apt:
        state: present
        name:
          - mosh
    - name: Install libraries with homebrew
      homebrew:
        state: present
        name:
          - ack
          - chruby
          - curl
          - git
          - node
          - ruby-install
          - tmux
          - vim
          - yarn
          - postgres
      tags: [homebrew]

    - name: Open up ports for mosh connections
      become: yes
      community.general.ufw:
        rule: allow
        port: 60000:61000
        proto: udp

    - name: Check if oh-my-zsh is installed
      stat: path={{ home }}/.oh-my-zsh
      register: zsh_directory
      tags: [zsh]

    - name: Install oh-my-zsh
      shell: curl -L https://github.com/robbyrussell/oh-my-zsh/raw/master/tools/install.sh | sh
      when: zsh_directory.stat.exists == false
      tags: [zsh]

    - name: Clone dotfiles
      git: repo=git@github.com:nickhammond/{{ item }}.git dest={{ home }}/.{{ item }} force=no update=no
      with_items:
        - dotfiles
        - dotfiles-private
      tags: [dotfiles]

    - name: Add after.zsh to oh-my-zsh/custom
      file: src={{ home }}/.dotfiles/after.zsh path={{ home }}/.oh-my-zsh/custom/after.zsh state=link
      tags: [dotfiles]

    - name: Symlink regular dotfiles
      file: path={{ home }}/.{{ item }} src={{ home }}/.dotfiles/{{ item }} state=link
      with_items:
        - gemrc
        - gitconfig
        - tmux.conf
        - vimrc
        - commands
        - zshenv
      tags: [dotfiles]

    - name: Grab the solarized theme
      git: repo=https://github.com/altercation/solarized.git dest={{ home }}/.solarized

    - name: Create .vim/bundle
      file: path={{ home }}/.vim/bundle state=directory
      tags: [vim]

    - name: Grab Vundle
      git: repo=https://github.com/gmarik/vundle.git dest={{ home }}/.vim/bundle/vundle
      tags: [vim]

    - name: Create src folder
      file: path={{ web_home }} state=directory
      tags: [repositories]
We’ll need to add our private key file to our keychain so that git clones authenticate properly and don’t fail when running via Ansible. This also keeps the key passphrase in the keychain which is handy, you’ll need to enter your key passphrase when it prompts you.
ssh-agent zsh
ssh-add ~/.ssh/id_rsa
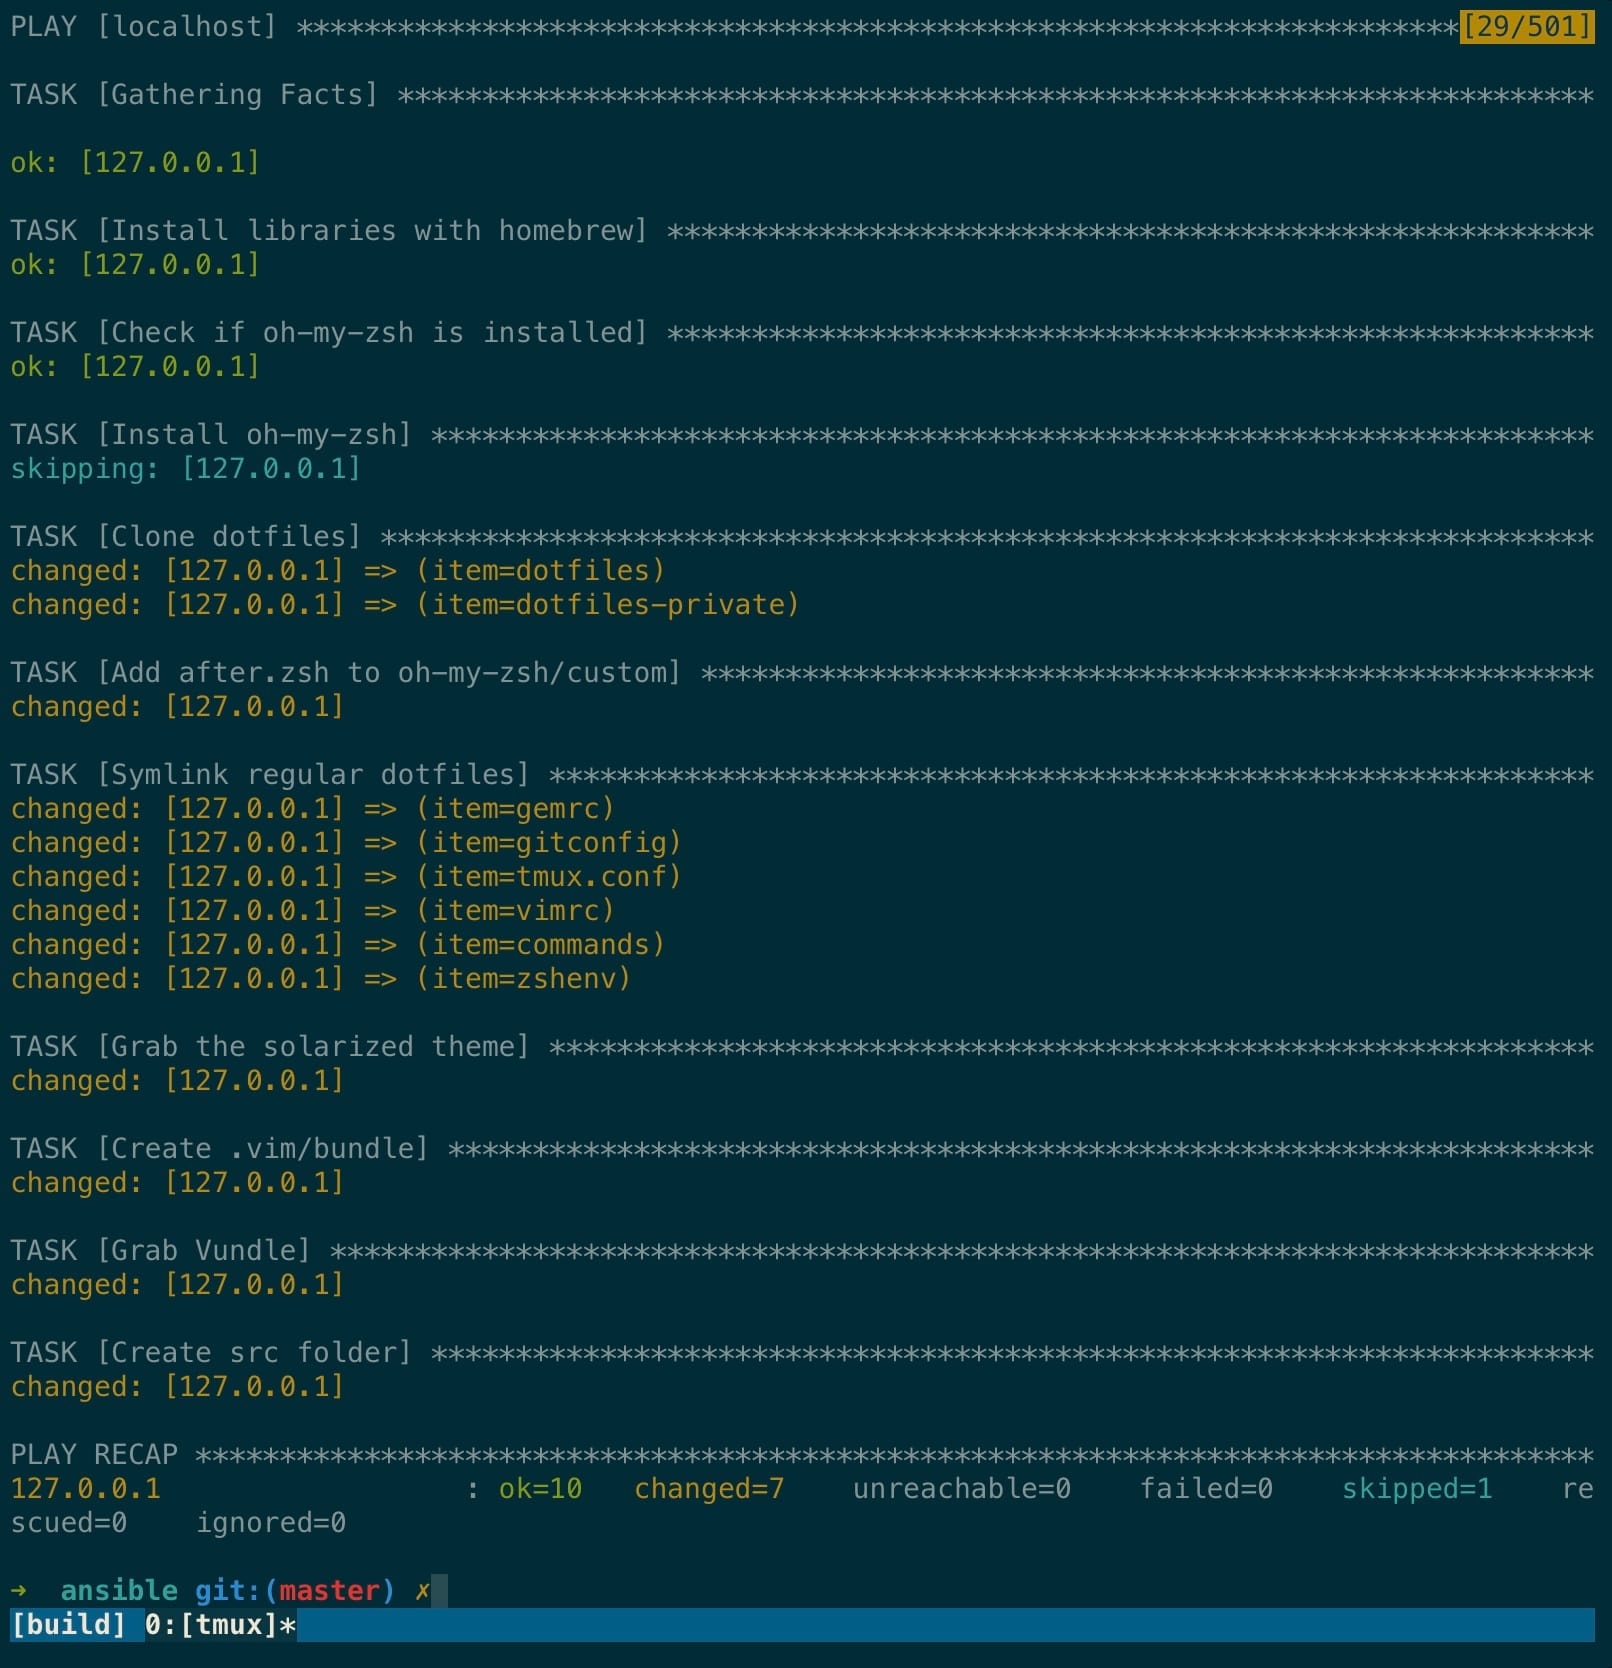
With that in place now you can run Ansible against localhost and it’ll install our development dependencies. The Homebrew step in this playbook is going to take a bit of time to run.
ansible-playbook --connection=local --inventory=127.0.0.1, playbook-cloud.yml
Booting Rails
If you look through the playbook.yml file you’ll notice we installed chruby and we created a new directory for our projects at ~/src. We need to add a few lines to our profile files which we can find by running brew info chruby. Run that and once you’ve completed those steps run source ~/.zshrc to reload your profile and running which chruby should return the chruby function. We also installed ruby-install which is how we’ll actually install our rubies which will go into ~/.rubies
We’re now done with the Ansible part of this so we can move out of the ansible directory and into the newly created src directory. At the time of this writing 3.0.3 is the latest ruby, we’ll go ahead and install that.
cd ~/src
ruby-install ruby 3.0.3
If you haven’t reloaded your shell you’ll want to do that now to ensure you’re using your local ruby version and not the system one source ~/.zshrc. Running which ruby should return a path that contains ~/.rubies and not linuxbrew. If it doesn’t then go ahead and set your default ruby by storing a .ruby-version file in the src directory:
echo "3.0.3" > .ruby-version
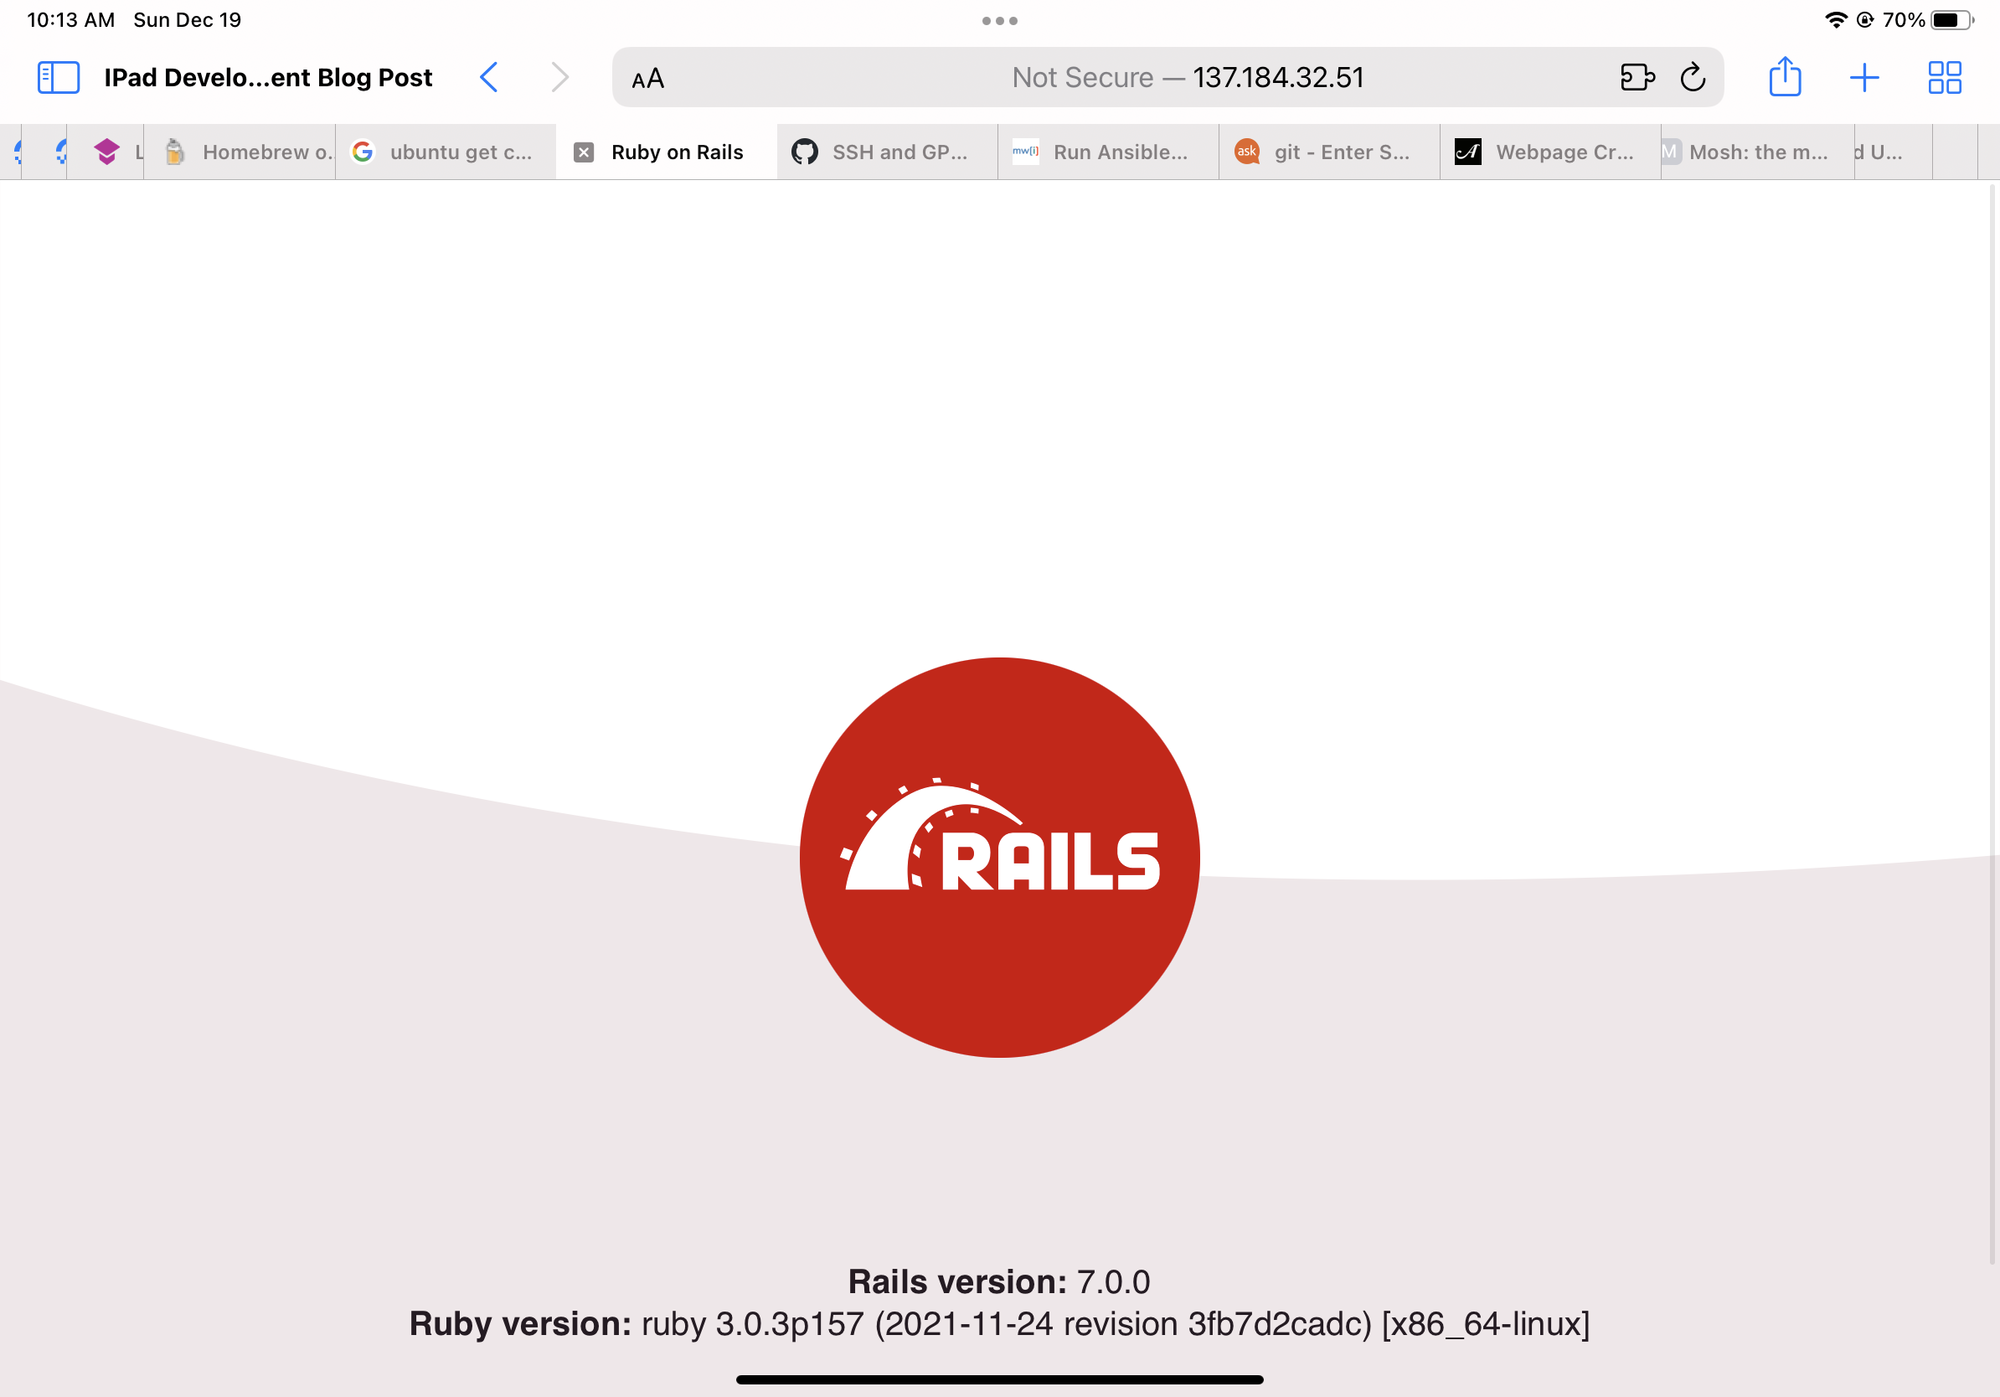
Double check that you’re using one of your locally installed rubies again by running which ruby and it should return something in your home directory and not linuxbrew’s. Now that we 3.0.3 installed we can install Rails:
gem install rails
And then create our fancy new Rails 7 app
rails new -d poostgresql demo
cd demo
Assuming everything went smoothly the Rails app will now boot but we still need to connect our app to Postgres. Test that Rails can boot by opening up a console with rails c.

Create a new docker-compose.yml file in your Rails app with the following contents:
version: '3.7'
services:
  postgres:
    image: postgres:13
    environment:
      - POSTGRES_PASSWORD=some-really-long-secret-password
    ports:
      - '5432:5432'
    volumes:
      - ./tmp/postgres-data:/var/lib/postgresql/data
With that in place go ahead and bring up Postgres with docker-compose up. One important thing to note with the Docker marketplace image from Digital Ocean is that any container that you boot and bind to a port is going to open that port up publicly. With this docker-compose.yml file it’s going to make postgres available at your-ip:5432, Docker has some great documentation about locking this down for your specific use case which is beyond the scope of this post.
We have one last change to tell Rails to look for Postgres over localhost instead of it’s default socket-based connection, open up your config/database.yml file and change the development section so that you have the following connection details:
host: localhost
username: postgres
password: some-really-long-secret-password
After that connection change run bin/setup and you should see that Rails is able to create your database and you’re ready to go.
We’re going to boot the Rails server over the default port and for this Docker image, ufw has already been setup and enabled so we need to allow a few more ports for this. For this demo I’m just going to use the default port and restrict access to it via UFW. First, grab your current IP address by opening a new Blink tab and typing curl ifconfig.me, copy that IP address to use in the next command.
sudo ufw allow from ip-address-from-previous-command proto tcp to any port 3000
Now we can boot our Rails app!
rails s -b 0.0.0.0
And now we can utilize our regular IDE environment from anywhere including our iPad!
Disclaimer: I do want to point out that utilizing a setup like this does open up whatever you’re working on to the public internet. This is often already the case with many of the online IDEs out there but just something I want to point out. This post is already long enough but if anyone is interested in getting into some additional access control let me know and I can write something up about it. This is easy enough to do with IP tables or UFW by restricting requests to specific IP addresses.